
The Participants Grid consists of the following columns:
- Participant Email - unique identifier and can't be modified
- Participant Name - participant name and can be modified
- Permission - Evaluator, Project Manager, Viewer, Evaluator/Viewer
- User Priority - user weights used in the Synthesize Results, this column is hidden by default. Use the column choose to show.
- Evaluation Status:
- Has Data - Yes if the user has judgments, No if none.
- Evaluation Progress - percentage; the number of judgments evaluated / total of judgments to evaluate
- Last Judgment Type - date/time the last judgment was made
- Staus (Disabled?) - checkbox to enable or disable a participant from the model
- Actions - reset password, get link, login as participant, view only pipe
- Participant Attributes - attributes are used to assign participants to groups dynamically. Participant Attributes can be dynamic or non-dynamic
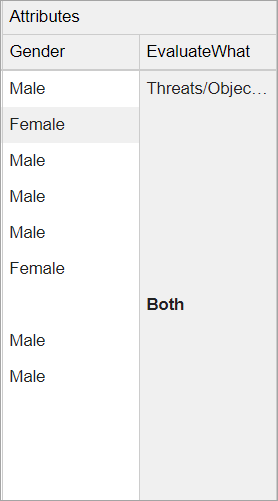
- Non-dynamic Participant Attributes - are assigned to the participants manually in the Participants grid. These attributes have a white background color and are editable (Gender)
- Dynamic Participant Attributes - are specified to the participants based on their insight survey answers. These attributes have a gray background color and non-editable (EvaluateWhat)
- Participant Groups
- Non-dynamic Groups - participants are assigned to non-dynamic groups manually in the Participants grid by checking the checkboxes. Non-dynamic groups have a white background
- Dynamic Groups - participants are assigned to dynamic groups, as specified by their attributes. Dynamic groups columns have a gray background and the checkboxes are disabled


You can search by typing in the participant name or email:

If there are many participants in the list, you can use the pagination at the bottom of the grid.

You can hide or show columns using the column chooser:

Click  to export the participants' list in .xlsx format.
Participants can be added to a model in a variety of ways.
This can be done on IDENTIFY/STRUCTURE > IDENTIFY > Participants page.

1. Enter or paste from the clipboard

a) Choose to enter one or more email addresses and corresponding participant names, or
b) Paste one or more email addresses/Names from the clipboard after placing this information on the clipboard from another source, such as an Excel spreadsheet, Word table, or Microsoft Outlook Contact Group.
NOTE: If you have a Microsoft Outlook Contact Group, you can place the names and email addresses in the Contact Group on the clipboard by composing an email to the group, expand the group name to have the individual entries displayed, copying them to the clipboard and discarding the email.
If the email of any participant added in 1a or 1b above already exists in the Workgroup, the Name field is ignored.
Options include:
- Adding participants as a member of a group. The roles assigned to the new users will be determined by the roles assigned to "All Participants" as well as the group to which they are made a member. Note that participants added via invitations with access code or meeting ID will also be assigned to the selected group. The default group for general links can be defined from the Invite Participants page. By default, participants will be added to the "No Group". The participant is added to the default group that is currently set at the time he/she accesses the invite link. You can also add or remove groups from this screen.
- Generating a random password, and
- Sending a registration notification to new participants. Note: Some mail spam filters may block the reception of such notifications.
2. From existing workgroup members
A dialog will appear in which you can select from a list of participants in the Workgroup.
3. From your Active Directory account (Exchange)
Applicable only if your site organization has a Microsoft Exchange Active Directory that is accessible via the internet. You may have to ask your IT administrator if this is the case and request a login name and password.
After entering the LDAP Server URL, the Username, and Password, you can enter a search string and click Search. The search string can be part or all of a name or any part of a name or email.
You can edit the participant's name in IDENTIFY/STRUCTURE > IDENTIFY > Participants screen.
Simply click on the name of the participant you want to modify, do your changes and then press Enter to save.

Note: Email addresses are unique identifiers and cannot be modified.
There are four icons under the Actions column of the Participants table:

- Reset Password sets/resets the password for the participant. Gold
 key indicates that the user has a password, blue
  key indicates that the user has no password.
 - Copy the evaluator's anytime link on the clipboard

- Log out and log back in with another user's anytime link

- View the evaluation steps and judgments for any evaluator. This is a 'view only' mode so while you can enter or change judgments, they will not be saved.

 key indicates that the user has a password, blue
  key indicates that the user has no password.


Note: Actions 2-4 are also available from the Evaluation Progress screen.
You can remove or delete participants from IDENTIFY/STRUCTURE > IDENTIFY > Participants page.

Clicking the Remove button displays 3 options to remove the participant(s):
- Remove selected participants. This option is grey out until one or more participants are selected using the checkboxes to the right of the participants.
- Remove all participants who have not completed their judgments, and
- Remove all participants who have no judgments
You can erase the participant's judgments in IDENTIFY/STRUCTURE > IDENTIFY > Participants screen.
Simply check the checkboxes to the left of the participant(s) you want to delete judgments, click Edit > Erase Judgments.

A prompt to delete judgments for Likelihood, Impact, and controls will be displayed.
You can select to delete only the judgments for Events, for Threats/Objectives, or both from the radio buttons.
Select as desire and click OK.

You can set and edit participant priorities (that will be used to weigh the participant's judgments).
By default the User Priorities is hidden, use the column choose to show it:

When the User Priority check box is enabled, the User Priority column is displayed as shown above.
You can then set the relative priorities by typing in a value from 0 to 100% in a cell:

By default, all of the participant priorities are the same value of 50% so that you can easily either increase or decrease the priority of one participant.
You can specify to see results with or without participant priorities when viewing results in the Synthesize screens, by clicking the User Priorities check box in Advanced mode.

Judgments can be copied from one participant to another participant(s). This can be done on IDENTIFY/STRUCTURE > IDENTIFY > Participants page.
Select Edit > Copy Judgments:

This will open a window where you can select the participant from where the judgments will be copied from (left) and the participant(s) where the judgments will be copied to (right):

You can add, edit and delete the participants' groups from IDENTIFY/STRUCTURE > IDENTIFY > Participants page.
Participant Groups can be used when:
- Setting up roles and
- Displaying results
Participants' Groups can be:
- Dynamic - in which membership is determined based on the Participant's attributes.
- Non-dynamic - membership is manually assigned by the Project Manager, or as specified when getting the AnyTime General Invitation link.
Click the  button.
The Manage Groups window will be displayed where you can add, edit and delete groups.

To add a new one, type in the Group name in the text box and then press the plus icon:

Groups are displayed as columns on the Participants table.

Groups added from the Manage Groups window have a white background color. You can manually assign the participants to the groups by checking the corresponding checkboxes on the Groups columns.
Participants' Groups can also be Dynamic -- in which membership is determined based on the Participant's attributes. Dynamic Groups columns have a gray background and the checkboxes are disabled.
Managing Participants groups is also available on the Participants Group page.
Participants Attributes can be managed in the IDENTIFY / STRUCTURE > IDENTIFY > Participants page.
Overview
Participant attributes are the attributes or properties that are assigned to the participants. Participant Attributes are used to:
- Create Dynamic Groups,
- Filter Alternatives in the Synthesize Results pages.
You can add participants' attributes in two ways:
Manage Participants Attributes
Clicking the Manage Participants Attributes  opens a window where you can add, edit, or delete participants' attributes.

The added participants' attributes are displayed as new columns on the Participants' table.
The attribute values are pre-populated if the 'Default Value' is specified, otherwise, the cells will be blank. The Project Manager can update the values by clicking on the cell, and then typing in the value as desired. Participant's attributes added in this manner have a white background to indicate that it is editable.
Add Attributes Using Insight Question
Participants' Attributes can be added from Insight Questionnaires by clicking 
Participants' Attributes added from Insight Questions are also displayed on the Participants table, but the cells are not editable (greyed out). The attribute values are populated based on the participants' answers to the linked insight question.

By default, the attribute name is the same as the insight question, you can edit it as desired, we recommend making it shorter. In the example above, the Attribute is renamed to "EvaluateWhat".
The attribute values are populated based on the participants' answers to the question "What do you want to Evaluate?".
From above, the user named "John Doe" has an insight answer thus it shows "Objectives Only" on the attribute value that corresponds to this user.
This attribute assignment gets updated whenever John Doe modifies his answer to this insight survey question.
The Project Manager can create Dynamic Groups by checking the "Create dynamic groups check box". See more details about Dynamic Groups here.
You can create Dynamic Groups in the IDENTIFY/STRUCTURE > IDENTIFY > Participants page.
A Dynamic group is defined as a participants' group in which membership is determined by the participants' attributes. This allows the Project Manager to define the participants' evaluation roles in terms of their attributes.
There are two ways to create Dynamic Groups:
1. Create Dynamic Groups from Participant Attributes Filter
Click  to open a modal where we can filter the participant's list by participants attributes:

Here you can specify one or more conditional statement(s) and then create a Dynamic Group based on the created filter.
Click  to add a conditional statement:

From above, "Department" is the participant attribute name, when there are more participant attributes in the model, you can click on it to expand the dropdown
"Equal is the conditional statement. Other conditions are available depending on the attribute type (string, bool, int, long). For string, the following conditions are available:

The last text box is where you will enter the attribute value, for example, "Engineering".
Click  to see the filtered list.

You can add more conditions as needed and specify if:
- AND - all conditions must be satisfied
- OR - at least one should be satisfied
Click  to create a group based on the current condition.
A prompt will open where you will specify the group name, in our example, we will enter "Engineering"

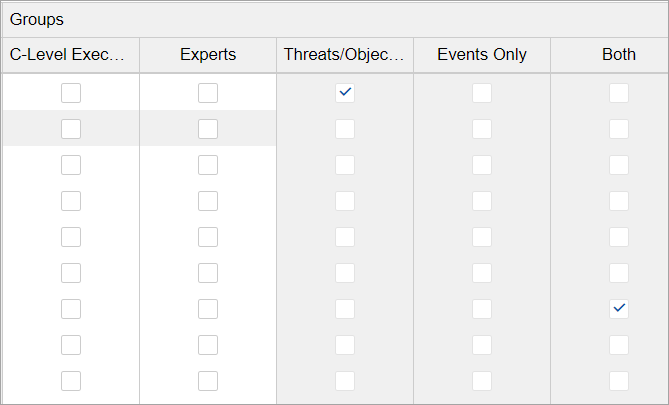
The new dynamic group is added as a new column on the participant's grid, under the "Groups" section.
Notice below that the participants with "Department" as Engineering belongs to the group Engineering as shown on the checkmark on the Engineering group.

The Dynamic Groups cells/checkboxes in the Participants table are disabled (greyed out) since its assignment is based on the participants' attributes conditional statement(s), thus it can't be edited.
Non-dynamic groups (C-Level Executives in the example above) have a white background and can be edited by checking/unchecking their checkboxes.
The Dynamic group assignment is being updated automatically each time the attribute assignment is changed or modified.
2. Create Dynamic Groups based on Insight Questionnaires
Dynamic Groups can also be added when creating a Participants' Attribute from an Insight Question.
For example, we have an insight question:

A Participant Attribute can be created from this insight question, and the possible answers or choices are the dynamic groups the participants can be assigned to, as determined by their answer to the questions
To add dynamic groups from an Insight Question, click the  button.
This will open a modal listing the insight questions of the model.
Simply select the question you want to link to a participant attribute and then check the check box to create groups using the answers on the selected survey question.
From above, a participant attribute was named "EvaluteWhat" was created. The dynamic groups were also created based on the following answers:
- Threats/Objectives Only
- Events Only
- Both
When dynamic groups are created, roles can be assigned to the participants dynamically by setting up roles for the dynamic groups.
For example, for the Dynamic Groups added from Insight Survey above, the Project Manager can assign the roles as follows:
- Threats/Objectives Only -- assign roles to evaluate only the Threats (Likelihood) and Objectives (Impact)
- (EvaluateWhat equals "Threats/Objectives Only")
- Events Only -- assign roles to evaluate only the Events
- (EvaluateWhat equals "Events Only")
- Both -- assign roles to evaluate both Threats/Objectives and Events
- (EvaluateWhat equals "Both")
- All Participants -- Undefined or Drop All
When a participant answered the insight question with "Events Only" and then clicked the Next button, the participant will be added to the "Events Only" group, thus the evaluation will be created according to the "Events Only" and "All Participants" roles, that is, to evaluate only the events.
You can update the model user permission on the IDENTIFY/STRUCTURE > IDENTIFY > Participants page.
A model user can be a Project Manager, Evaluator, Viewer, and Evaluator/Viewer.
- Project Manager - has overall control over the model
- Evaluator - are participants to evaluate the decision model
- Viewer - can view the structure and results of the decision model
- Evaluator/Viewer - has evaluator and viewer permission
Project Managers are displayed in bold font in the project's participants list.
Read the table below to see more of what each role can do!
Model Level Permission
| Permission | Project Manager | Evaluator | Evaluator/Viewer | Viewer | |
|---|---|---|---|---|---|
| Y | ||||
| Y | ||||
| Y | ||||
| Y | ||||
| Y | ||||
| Y | ||||
| Y | ||||
| Y | Y | Y | ||
| Y | Y | Y | ||
| Y | Y | Y | ||
| Y | Y | Y | ||
| Y | Y | Y | ||
| Y | ||||
| Y |
Assigning a Project Manager permission depends on the Workgroup Permissions (System Manager, Workgroup Manager, Project Organizers, Workgroup Members) of a user.
All Workgroup Users except Workgroup Members can be Project Manager.
|
| ||
|---|---|---|---|
| Y* | ||
| Y* | ||
| Y** | ||
| N |
* user automatically becomes a Project Manager once he/she accessed the project.
** Optional as assigned by the Project Manager. A Project Organizer who created a model is a Project Manager of that model.
When you try to set a Project Manager permission to an Evaluator that is only a Workgroup Member, a confirmation prompt asking to make him/her a Project Organizer will be displayed, click OK to agree.
Note also that a Workgroup Manager in a Workgroup is always a Project Manager in each model.
You can enable or disable model participants from IDENTIFY/STRUCTURE > IDENTIFY > Participants page:
To enable/disable model participants:
- check (disable) or uncheck (enable) the check box on the 'Disabled?' column, or..
- select the participant(s) you want to enable or disable, and then click the Edit button and select Enable or Disable.

Disabled participants are displayed in grey font color. Disabled participants will not be able to enter judgments but judgments they previously entered will be included in computing results. If you want to not have this be the case, you can restrict roles for the disabled participant or delete their judgments as described above.
