The Threats hierarchy can be created, viewed, and edited from any of the following pages:
- IDENTIFY/STRUCTURE > IDENTIFY > Threats; or
- IDENTIFY/STRUCTURE > Threats > Hierarchy or
- LIKELIHOOD OF EVENTS > STRUCTURE > EVENTS SOURCES > Threats.
In Riskion, we refer to threats, causes, hazards, and sources interchangeably. While they may have slightly different nuances depending on the context in which they are used, they serve the same purpose -- they are all threats of risk (for Risk Events) or sources of opportunity (for Opportunity Events).
The default wording can be defined on the Workgroup Template; or from Default Option Sets. You can also change the wording for each model on the Judgments Options page of the model.
Before adding Threats, we suggest you read how Riskion defines Threats -- Riskion Taxonomy (Risk Elements and Risk Measures).
 Manage Threats -- Add, Edit, Delete, etc.
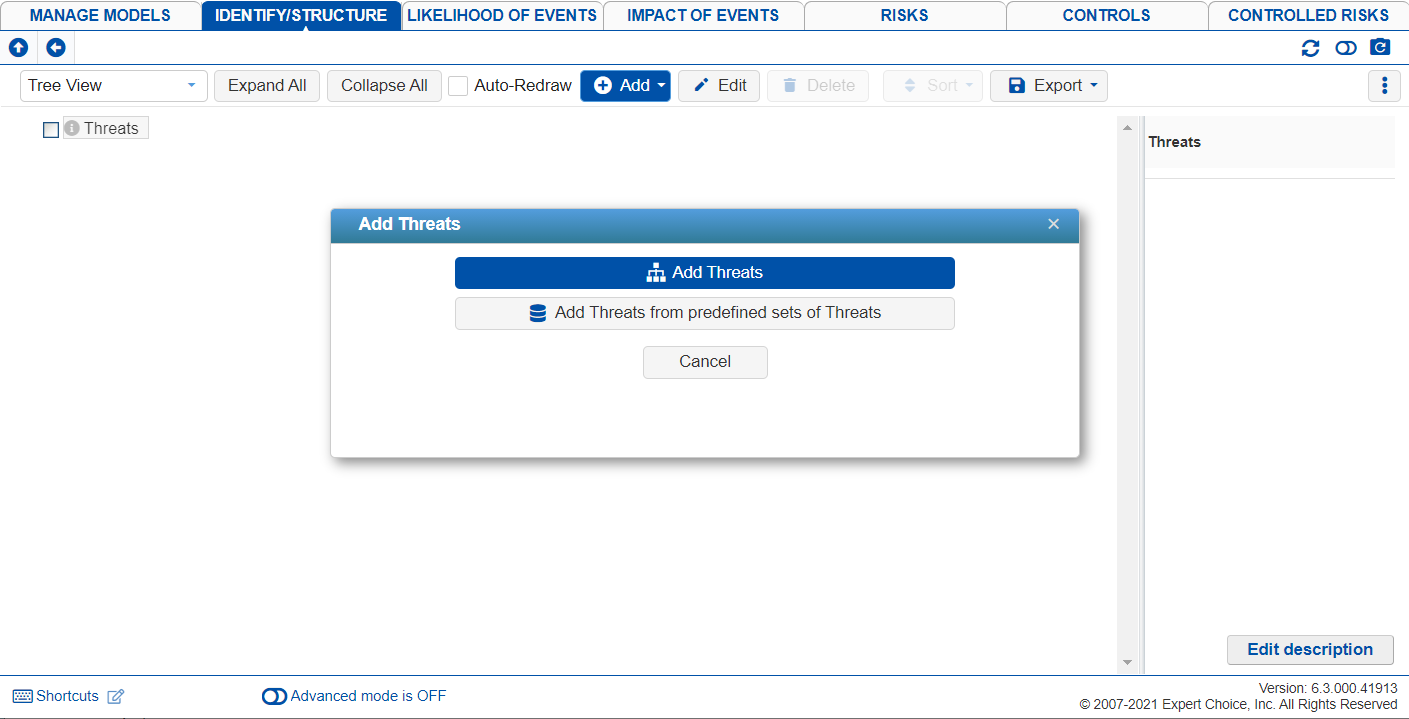
Depending on the Default Option Sets wording used when creating a model, the overall statement will be shown, in this case, "Threat" and can be edited. A prompt to add threats will pop out as shown above.
Add Threats (same level or below)
You can add threats below the Threats node.
Additional elements (threats, sub-threats) can be added either at the same level of the currently selected node by pressing Add Threats (same level) button, or below the currently selected button, by pressing Add Threats (level below) button.

Pressing either of the first two options above will open a dialog:

Here you can either:
a) enter one or more elements, along with brief descriptions (a simple form of an information document which you can modify later using the Edit description or i buttons). Adding one or more spaces before an element name will indicate that the element should be added at a lower level in the hierarchy.
b) The Paste from Clipboard  button will paste elements that have been previously placed on the clipboard into the hierarchy. These elements can be placed on the clipboard in a variety of ways:
- By copying from adjacent rows/columns in an Excel spreadsheet
- By copying from adjacent row/s columns in a Word document
- By copying from a tab delimitated text file, where the tab is used to separate the element name from the element description.
The Threat and the threat names can be edited by selecting them and clicking the Edit button or by double-clicking the node name.
Checking the Categorical checkbox to the right of the threat will add a threat as a category. A category won't be part of the evaluation, it is only used to categorize or group similar threats. A category threat is shown with the blue font in the Threat hierarchy.
Add Threats from predefined sets of Threats
The Add Threats from predefined sets of Threats allows you to add new threats from predefined threats determined by the site administrator.
Add/Edit Threat as Categorical
Threats can be defined as Categorical when you want to group threats of the same category. The category will serve as a container to the threats below it. Categorical threats will not be evaluated.
You can add a categorical attribute from the Add Threat modal and then check the categorical checkbox to the right of the categorical threat you want to add.
You can also edit an existing set threat by double-clicking on it and then checking the Categorical checkbox.

Alternatively, you can right-click a threat and then select Set as a Category.

Delete Threats
You can delete one or more threats by selecting them and clicking the Delete button.
You can also right-click a threat to see a set of commands, and then select Delete.
HINT: It is advisable to save a copy of the model before deleting many elements in case you want to save a copy of your model before the deletion. You can also use the Model Snapshots feature to revert to what you had.
Threats right-click commands
Some commands already explained above and more are available by right-clicking a Threat node:
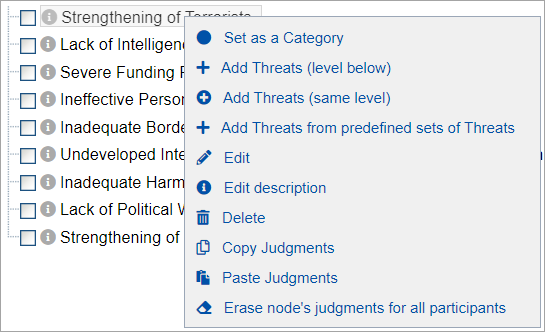
- Set as a Category - set a node as Category. If a node is currently a Category, this command will be Set as an Uncertainty.
- Add Threats (level below) - add nodes below the selected node
- Add Threats (same level) - add nodes same level as the selected node
- Add Threats from predefined sets of Threats - Open the predefined sets modal
- Edit - edit the selected node
- Edit description - open the rich text editor to edit the description of the selected node
- Delete - delete the selected node
- Copy judgments - copy judgments of the selected node
- Paste judgments - paste the copied judgments from another node to the selected node
- Erase node-s judgments for all participants - delete the judgments of the selected node
 will expand all branches of the hierarchy.
 will collapse the hierarchy and show only the goal and the first level of elements (threats).
You can also expand/collapse sections of the hierarchy by clicking the same icons at the left of the threat node.
When the Auto-Redraw box is checked, clicking on the name of any element will not only expand the branches below that element but will automatically contract the branches in other parts of the hierarchy. This is useful to be able to focus on a part of the hierarchy, see all of its ancestries, but not be distracted from details in other parts of the hierarchy.

Elements can be moved or copied from one position/level in the hierarchy to another by drag/dropping to the desired position in the hierarchy.
In Tree View, you can move or copy a node from one position to another by dragging and dropping. Simply select a node and hold on to the left button of your mouse and then drag to the position you want the node to be moved/copied (you will see a blue arrow as a pointer). Once you release the mouse's left key, you will then see a dialog asking whether to copy or move the node. Select and click OK to confirm.

You can also sort elements in the cluster below the selected threat or sub-threat by name ascending/descending:

Sorting by name can be done both in Tree View and Hierarchy View.
HINT: You can use the Model Snapshots feature in case you want to revert to what you had before the sorting.
Threats can be viewed in Tree View or Hierarchical View. By default, the Tree View is displayed as shown below:

You can use the drop-down to select the Hierarchy View:
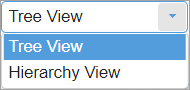
The Hierarchy View of Threats is shown below:

You can do similar actions such as adding threats, editing, sort by name, and export as you can do in the Tree View.
Additionally, you can show/hide the Events in the Hierarchy view by checking the  check box.

You can specify the rectangle length and width by clicking the gear icon 

HINT: For smaller screens, some of the buttons may be hidden. You may see the hidden buttons by clicking the ellipses  icon at the top right.
